
Understand The Ship Repairs
01 WORK PROGRAM
THE SCOPE OF WORK
Lorem ipsum dolor sit amet, consectetur adipisicing elit, sed do eiusmod tempor incididunt ut labore et dolore magna aliqua.
Duties responsibility
- The supervision engineer will go with the owner representative or his appointed crew to confirm the number as well as the construction requirements can be assigned to fit the construction work
- when itemize acceptance check , the construction unit shall be notified the supervising engineer to accompany with the ship owner to confirm acceptance ,then can continue start construction again
02 Main and aux engine turcharger repair
WORK DESCRIPTION
- Repair the turbocharger according to original maker`s construction manual
- Prepare special tools and cleaning boxes before dismantling for collection of parts
Disassembly cleaning process(met-sb type as an example)
- Remove the air filter and clean it properly
- Blower side
- Remove the air housing
- Remove the scroll chamber
- Suck in muffler material dirty need to dry with dry cloth
- The other air passage parts of the dirty to be used clean oil and wipe with a dry cloth
- front blades and the inpeller are been treated by anodic ,so used of the copper wire brush,scraper and strong acid and alkali detergent should be avoided
- Be careful not to gey any object into the passage
- Turbine side
- Pull the gas inlet inner housing out and pull the nozzle out
- remove the gas outlet guide cylinder
- The nozzles should be used with hot water together with cloth or copper brush to clean it thoroughly
- Turbine blades not needs pull the rotor
- Avoid use of sandblasting,scraper as these will make the blades damaged
- After washing must to fully dry
- Rotor
- Removed by the hydrualic jack according to the type of rotor
- The front blades and the impeller are removed according to the instruction manual
- Itemmized clean ,impeller surface area carbon to be removed
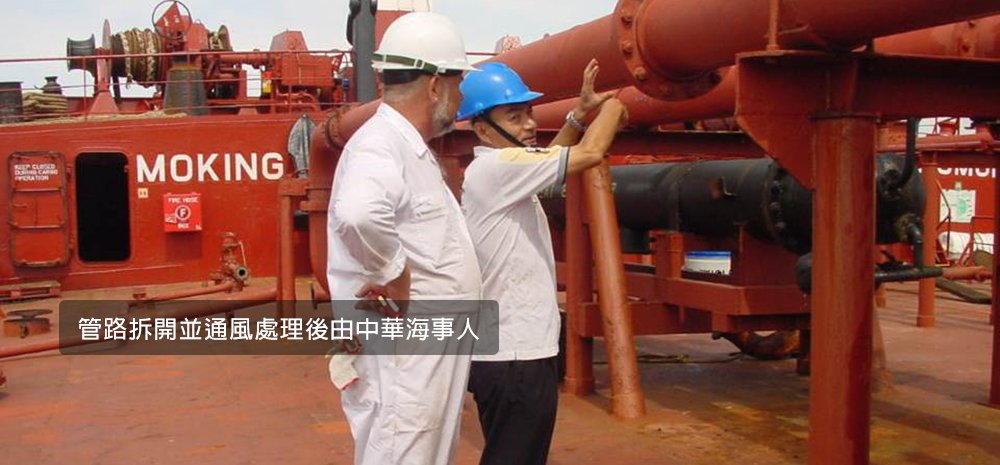
03 Pipelines renew project
WORK DESCRIPTION
- The crew needs to confirm what kind of piping system to determine the direction of construction(such as sea or fresh water cooling system or lub oil ,hydraulic oil or co2 system…etc)
- If it is involved in fire cutting work, the safety personnel are required to confirm the safety before they can start working
- New pipes material, thickness ,galvanized, must be confirmed and meets the owner requirements
- After removal of old pipes ,the new pipes made in accordance with the original shape and install back in place
- Some pipes may be too long which must welded at the scene
- Pipe fitting such as flanges packing and bolt nut..etc if damaged same to be renewed
- All the welding work are carried out by qualified welders
Quality requirements and precaution
- After new pipes completion if there are hydraulic or lub oil pipe its needs acid treatment
- Inspection method: a. The welding seam to be visually inspected, also accept if the owner or surveyor are required to do the nde check
- Final test: sea, fresh, fuel oil ,hydraulic oil pipes..etc pipeline cycle leak test as well as co2 pipelines
Record: record at repair completion acceptance voucher
04 Main and aux engine thrust bearing inspection
WORK DESCRIPTION
- Before start work please close the lub oil and air system
- Disassembly of pipe and brackets
- Confirm the stop position(forward or reverse position
- Turn the crank shaft ,remove the trust bearing cover and measure the clearances ,dismantling and release the stop push pads one by one
- Clean the parts and visually check the surface condition , if abnormal, marked up and ask ship or class surveyor to check whether to be repaired or replacements
- After inspected, re-install in place
- After completion of work, to be measured the clearances and record
Quality requirements
- Thrust bearing surface requirements ,according to the ship`s provided with the original maker`s regulation and making
- After upper push pad pull out ,ensure that the crankshaft must be in correct position
- After job completion, check again by the ship crew
Record
The data shall be log in the thrust bearing clearances record as according to the requirements of the owner
05 Main and aux engine cross head bearing inspection
WORK DESCRIPTION
- Before start work please close the lub oil and air system
- Open the crank shaft cover
- Measure the clearances before repair and record it
- Cross head bearing to be install stop device
- Turn crank shaft to low fulcrum
- Disassembly guide block then hanging out the cross head bearings
- Clean the alloy parts and cross head outside diameter surface, if there any abnormal to be marked up and ask ship or class surveyor to check whether to be repaired or replacements
- After inspected, re-install in place
- After completion of work, to be measured the clearances and record
Quality requirements
- The cross head bearing surface requirements ,to be according to the ship`s provided with the original maker`s regulation and making
- The technicians must check at any time to avoid any mistakes
- Must be very careful when cross head bearing hang out in order to avoid any scratched
- After job completion, check again by the ship crew
Record
- The data shall be log in the cross head bearing clearances record as according to the requirements of the owner
- Construction details to be log in the project acceptance voucher
06 Main engine withdraw cylinder
WORK DESCRIPTION
- Dair system ensure to shut down the oil and water circulation and air system before start work
- According to the specified number in order to withdraw cylinder
- Open the crankcase cover
- Head accessories part, such as nozzles, starting valve ,safety valve, in take exhaust valve, rock arm…etc. To be disassembly and record
- Open the cylinder head bolts in sequence, this job to be work according to the main engine instruction manual`s maintenance steps
- The cylinder head to be hang with fixed ring screw and move to vacant space
- Clean the head thoroughly, check the contact surface between head and cylinder, water jacket position, whether any oil leaking on intake and exhaust passage, also check is there any crack on the cylinder head , if find abnormal ask ship staff and surveyor re-check
- Head accessories part, such as nozzles, starting valv , safety valve, in take exhaust valve, rock arm…etc. If owner asked for grinding,After grinding to be checked by chief engineer and then reinstall in position
- Open piston rod screw, turn the piston to the hanging away position
- The piston fixes with steel ring and wire rope then pull out by engine room crane
- Clean the piston thoroughly, check piston ring and piston measuring piston outside diameter and piston ring gap, if there is any abnormal to be marked
- Clean the cylinder internal thoroughly, visual inspection the surface measure the inside diameter and record, if find abnormal, ask ship staff and surveyor re-check
- After measure the cross head bearing, according to the requirements to do some decomposition, clean, check skateboard, adjust the clearances according to the type of engine, after checked by chief engineer then reinstall in position
- After separation up and down crank shaft bearings, clean contact face and bearing alloy, measure the clearances before and after disassembly and assembly, after checked by chief engineer then install back in order
- Checked by the ship staff and surveyor if found any abnormal parts, needs to be repaired or renewed, then install back in order
Quality requirements and precaution
- Confirm the numbering and quantity of cylinder
- The crank shaft deflection must be measure before and after withdraw cylinder ,if the shaft diameter is more than 1/10000 ,it is necessary to inform ship immediatel
- When used ship`s special tool ,must be in accordance with the regulation of implementation
- All disassembled components must be cleaned and placed in the correct position according to the cylinder number
- Any spare parts needs to replaced inform the ship to prepare
- Check items and standard of withdraw cylinder to be carried out according to the maker`s instruction
- After re-assembly all components, the crankcase to be wipe properly with rag and cleaned thoroughly with vacuum cleaner
- After job completion ,ask crew on board to refill lubricating oil and water then run test main engine in good condition
Record
- All ship owners require replacement parts to be recorded within receipt
- Each measurement data is recorded in the main engine record table be submitted to the ship owner after work completion
- Construction contents is log in acceptance voucher
07 Purifier repairr
WORK DESCRIPTION
- Disc type purifier: prepare the tools,(a) crew provided instruction manual(b)spanner(c)working lamp(d)rag, scrapper, kerosene
- After confirming the number position, open the purifier cover first
- Remove the fixed nut on the tubular shaft
- Remove the water paring disc, gravity disk, disc stack in sequence
- Clean the water paring disk, gravity disk and disk stack and check for any damage
- Dismantle, release the tubular shaft, and clean the inside of the shaft
- Check the purifier chassis gears, oil seal and bearing and check whether the tubular shaft is subsidence
- Clean and check the purifier inside the body
- After checked and approved by used crew or owner representative to re-install in sequence
Quality requirements and precaution
- The tubular shaft shall not be subsidence or deformation
- The water paring disk and disk stack ,the quantity must be correct
- The gear ,oil seal shall not be damaged
- Inside the body shall not be crack, damage and corrosion
- The in and outlet pipe shall not be leaking or deformation
- The dismantled parts required to be cleaned and take care to avoid loss and damage
- The dismantled parts, if any damaged and need to be renewed which is necessary to tell the used crew and ship owner
- When the parts reassemble, ensure to follow the correct method
- After original manual is used
Record
work content is log in the acceptance voucher
08 Oily water seperator
WORK DESCRIPTION
- Prepare the tool:(a)spanner(b)working lamp(d)rag, scrapper, kerosene
- Make sure the oily water seperator is stopped and the inside has no rust water
- Add the heating water inside of oily water separator for initial cleaning
- dismantle the relative pipeline and oily water separator`s upper and front covers
- Remove the oily water separator filter check and clean
- Clean the inside of the oily water separator and check any damage, if there is an abnormal, mark it
- After checked approved by chief engineer or owner representatives then to re-install in sequence and test
Quality requirements and precaution
- To be visual inspection after removed upper and front covers ,shall not be any damaged or leaking water
- The water paring disk and disk stack ,the quantity must be correct
- The casing shall not be corroded
- Clean the filters and renewed if damaged
- The pipe fittings should be reassembled correctly
- Any parts removed from the separator ,if damaged and needs to renew ,shall be approved by used crew or owner representative
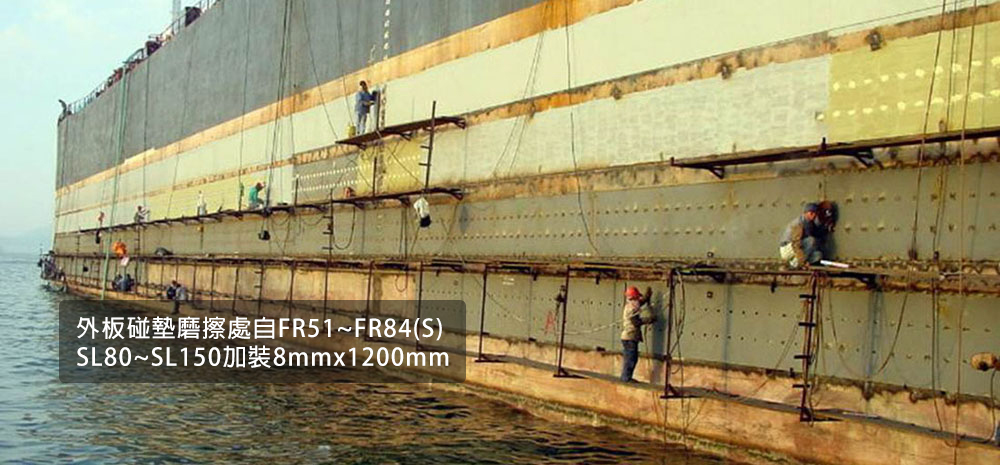
09 Reply shape work, welding seam repairs
WORK DESCRIPTION
- To ensure there is no combustible material inside the construction site
- Reply shape works steps
- Consider whether to remove the other associated structure
- The dent area to be heated to the desired temperature
- Use pad eye, chain block ,hydraulic jack, pillar.. Etc. Suitable for needs on- site
- Reply shape is in accordance with the requirements of owner and surveyor ,inform the owner and surveyor, if it does not reach the requirements
- Visual inspection of the shape welding seam condition, whether any corrosion
- Welding seam corrosion ,repair steps
- According to the original welding seam condition and decide whether to carry out internal and external repair
- If the welding area are ballast tank, oil tank, or water tank, needs to Cleaned it before welding
- Safety work must be done before start welding
Quality requirements and precaution
After visual inspection and then water pressure test, the water pressure test to be carried out according to the instruction manual
Record
According to the instruction manual, or ship owner or class surveyor`s instruction
10 Derrick boom block (mast top) disassemble /reassemble
WORK DESCRIPTION
- The scope of work to be according to superintendent engineer`s instruction, prepare following tools , equipments: crane, basket, hammer, screw knife, wire cleat, wire, spanner, pipe wrenches, oil grease, diesel oil, rags, scraper and safety rope..etc.
- Prepare work of derrick boom
- Inform bosun to check small derrick on top of mast, mast top rails, whether staircase is secure, to notify superintendent engineer before start work if any damaged
- Contact ship crews to operate crane to lower down the derrick
- To secure the loose wire rope and arranged neatly wire rope at cargo winch drum
- Workers used crane to hanging with a basket to top of mast and load the wire rope to cargo winch drum properly
- Removed the block from top of mast: disassembled block shackle, bolt, pin and use cargo crane to adjust wire rope and dismantle block from top of mast and hanging to the deck
- Block clean and inspection
- Decompose the block ,clean all parts with diesel oil, then notify supervisor engineer to accompany with owner to check the worn components
- During block decomposition process, if found rust and cannot be removed which necessary to be cut with fire torch
- Reassemble the block and reinstall in position: owner to be supplied new spare parts, reassembled the block with oil grease and install back in position
- Derrick boom recovery work: removed all tools and attachments for this work , contact ship screw to rising derrick boom, supervisor engineer accompany with owner representative check and run test to ensure derrick operation in good order
Quality requirements and precaution
- Load test according to the owner`s requirements
- The workers who working on top of mast ,must be very careful about the safety
- After block decomposition and cleaning ,the supervisor engineer needs to check with the ship engineer
Record
Repair project notice and completion record
11 Cargo derrick wire rope replacements
WORK DESCRIPTION
- The scope of work to be according to superintendent engineer`s instruction, prepare following tools: spanners, guide steel wire and wire cutter
- Derrick fixed : contact the ship crew to supply power and operate the derrick boom in to the deck
- Removed the old cargo wire rope
- Take out the wire rope by cargo winch, dismantle fixed bolts of winch drum and block
- After connect the guide steel wire to old wire rope, use derrick to take out the old wire rope and row on the deck, used wire cutter to cut off the old wire
- Derrick boom new wire rope replacement
- Use the wire rope provided by ship owner or the wire rope indicated by supervising engineer
- After the new wire rope ready connected with guided steel wire , use the derrick to put the new wire rope guide into block path ,until the rope twist into the wire drum then cut off the guide steel wire , the one end of new wire rope fixed in the drum and then row the rope into drum properly, other end of new rope fixed in the block finally
- During new wire rope twist into the drum, smear the oil grease into the wire rope, if required by the ship owner
- The other wire rope replacement: ( lifting wire) ,( guy wire )the replacement of new wire rope according to the steps of above items 3 and 4
- After the replacement is completed: after new wire renewed, operation test the rotate and hoist of the derrick boom and ensure the wire rope is go into the correct path
Quality requirements and precaution
- To ensure well secured between new wire rope and steel wire, prevent the joints loose off injury to the workers
- After completion of derrick boom repaired, the supervising engineer to be accompany with owner representative to operate test to ensure derrick is operation in normal
Record
Repair project notice and completion record
12 Windlass, mooring winch repairs
Windlass winches
WORK DESCRIPTION
- Foreman board the ship together with chief officer to ensure what to be repaired on the windlass
- Before dismantling the windlass ,to notify the crew to shut off the power and collect the oil of the system
- Notify the bosun to well secure the anchor chains
- Used oxygen and acetylene gas torch to cut off the windlass base and protecting shield
- Hanging away the windlass and transport to work shop for further break down
- Used all necessary tools to remove the windlass front cover bolts and hanging away by chain block
- Used spanners to dismantling 5 pcs of piston cover and take out by hands
- Used chain block to hanging out the windlass center shaft
- Used spanners to dismantling the back cover oil valve divider
- Visual inspection and use vernier caliper to measuring wear and damage condition of windlass oil pump center shaft and ball bearings
- Foreman to notify supervising engineer to accompany with owner or ship staff to check wear parts in site, confirmed and processed
- Any worn parts needs to be renewed and supply, shallbe in accordance with instruction of ship owner
- After completion of windlass repaired ,deliver back on board, and run test together with ship staffs
Quality requirements and precaution
- To ensure that the power is turn off and the hydraulic pipeline system is also shut off, before start dismantling the windlass
- It is necessary to check thoroughly whether the oil pipe system is without clogged when reassembling the windlass
- Must be pay attention when windlass transport back to the vessel, to prevent damage of windlass and safety of workers
Record
Attached the measurement records
Mooring winches
WORK DESCRIPTION
- Foreman board the ship together with chief officer to ensure what to be repaired on the mooring winches
- Before dismantling the mooring winches ,to notify the bosun to well secure the mooring winches with rope
- Used oxygen and acetylene gas torch to cut off the mooring winches base and protecting shield
- Used all necessary tools to dismantling the base of mooring winches and cover of bearing shell
- Hanging away mooring winch from base by chain block, then transport to work shop for further break down(this job needs to coordinate with big crane and forklift )
- Used all necessary tools to open winch pump`s front cover bolts and hanging away by chain block
- Again used spanner to open up 5 pcs of piston cover and moved away by chain block
- Used chain block to hanging out winch`s center shaft then opened up back cover oil valve divider
- Used scraper , sand paper, rag, kerosene and wire brush to clean up the center shaft and 5 pistons
- Visual inspection and use vernier caliper to measuring wear and damage condition of winch cylinder and piston rings
- Foreman to notify chief mate in site to check worn parts ,and confirm parts will be ship or work shop supply
- Completion of mooring winch repaired ,deliver back on board, and run test together with ship staffs
Quality requirements and precaution
- To ensure that the power is turn off and the hydraulic pipeline system is also shut off, before start dismantling the mooring winch
- It is necessary to check thoroughly whether the oil pipe system is without clogged when reassembling the mooring winch
- Must be pay attention when mooring winch transport back to the vessel, to prevent damage of windlass and safety of workers
Record
Attached the measurement records